Data Binding and Changing color of a page using AngularJS

AngularJS, wherever we go this word is heard innumerous of times. There is no wonder in it being this famous, it helps developers to avoid repetitions of code, extends the HTML code What is it? What does it to? How does it work?

Let me answer these questions in a simple one word answers-

What is it? It is a JavaScript framework.

What does it to? It allows to write code in MVC (Model View Controller) . It has many features like data binding, dependency injection, directives, filters and many more.

How does it work? Let us see how one of the features the data binding works and how can we change the color of a page.

Add AngularJS to a HTML page by giving the below link as src to the script tag:

http://ajax.googleapis.com/ajax/libs/angularjs/1.4.8/angular.min.js”

Now we need to learn about ng directives, it is AngularJS directives, which are used to load an app, controller, bind the data with HTML.

Let us discuss briefly about the directives used in this page color change app.

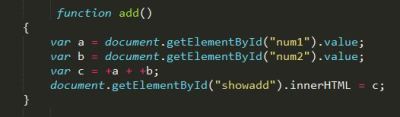
ng-app : ng-app helps to connect the AngularJS to the HTML. It can be given to HTML tag or any div tag and it can be defined using var appname = angular.module(‘appname’,[]); here appname is the name of the app and  [] is for dependency injection, if it is empty then the app doesn’t have any dependencies.

ng-controller :  ng-controller connects the controller to the HTML. It can be defined using appname.controller(‘controllername’, function(){}); . Here the controllername is the name of the controller and the function can be declared inside the controller as anonymous or can be declared outside with a name and pass the name to the controller.

This controller code can be written within a script tag or any new js file. This directive can be given to body tag or any div tag.

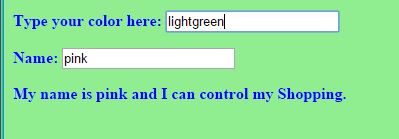
ng-model: This directive helps in databinding. This is a way to take the data from the HTML tags like <input> and bind it to a variable. Ex: <input type=”text” ng-model=”variablename”> . This data in ng-model can be passed using ng-bind.

ng-bind : The data stored in variable of ng-model can be passed in ng-bind. The alternative for this is expressions {{ }}.

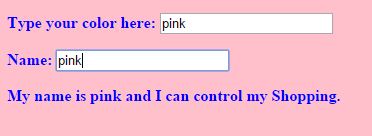
ng-init: This is used to initialize a variable. This can be passed in any html tag. In this example I initialized it to pink first.

The complete code for this app can be found here: https://github.com/sirishagavini/AngularJS–Changing-color-of-a-page

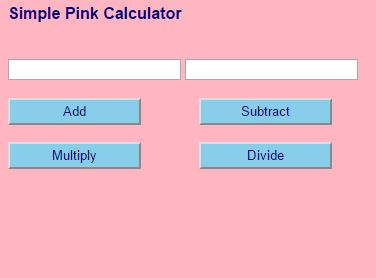
The output looks like –

Angy1 Angy2 Angy3

Simple Calculator with JavaScript and the Sassy SASS

Lets learn how to make a simple calculator with JavaScript and style it with SASS.
What we can do with this Simple calculator is add, subtract, multiply and divide.
The beauty of javascript lies in its simplicity, the code for all the actions(add, sub,mul,div) used here is pretty much same. So, lets see the code of one of the actions –

jsadd

document.getElementById(“”)

Here num1, num2 are the id’s for the input tags where we give the two integers as input. and .value helps to take the input values and .innerHTML helps to show the value in “c” at the html tag with id”showadd” as below.

jsaddhtml

Why + in front of variables a and b in var c =+a + +b;

Because, the variables a and b were strings before and with + they are converted to integers.

Linking HTML to CSS:

jsaddcss

Wait, CSS? But you said with SASS . Yes we always link the HTML with CSS. Infact it is the styling language which HTML understands. SASS is one of the CSS prepocessors and it’s files will have.sass extension. So, now we need to compile our .sass file to .css and link them as above, this can be done using many tools, I used Koala.

Here is the SASS code and the converted CSS code respectively:

jsaddsass

jsasscss


The final app looks like:

SimpleSassyCal

Converting a PSD file to HTML, CSS

Converting a PSD(PhotoShop Document) to HTML, CSS, all we have to do is slicing and converting. All this might be confusing but yes that is all we have to do.

First, we need to have a PSD file.But how to do we get that? Its simple, we can create one by ourselves in Adobe Photoshop or any other comfortable editor. Try to add more layers, images and represent text in different formats, this will be helpful in getting more experience.If you could not find anything in the first place, do not panic  but just explore it more and more, you will definitely find a way (Remember, no one can teach you better than you do to yourself) .

So, now we have our PSD file ready. Now we have to open a IDE like Net beans or Eclipse. Create empty HTML and CSS files so that we can add code for the items we have sliced in the PSD.

Slicing a layer in Photoshop

This can be done in PhotoShop by using Slice Tool. Just select a part of the PSD you want to replicate in the browser page and save it in an image format (JPEG, PNG) .

psd1

Converting to CSS Code

If it is a background and it goes like a banner like shown above, then the CSS can be like body to use repeat-x  to repeat the background image along x-axis, if it is just an image then CSS can be like #nav

psd2

Selecting a text in PhotoShop

Select Horizontal Type Tool and click on the paragraph and it allows to copy the text and this text can be posted in the HTML file. This text can be placed in a <p> tag, there are many alternatives for  this tag. Choose the best tag which meets your requirement.

psd3

Replicating Image from PhotoShop to HTML

If you have a image to replicate then put the image in a new folder in the project in IDE. (In this example, imageresource is a folder) .now, give reference to the image as below in the HTML file.

psd4

Tip: Refresh the browser to see the changes effected after every single change done to the code. This helps to keep track of any mistakes.

Simple, This way you can convert a PSD file o HTML file 🙂

Shopping Tracker App

Haha I am a girl who loves to shop, in fact shopping is like a therapy to me 😛 . I always wanted to keep track of my stuff. So I created this app so that I can get cut down my unnecessary shopping.  Oops,a girl never shops for no reason, So no shopping can be an unnecessary, so its just an extra shopping.

Here is the code to create yourself such app by the link following link from Github  https://github.com/sirishagavini/ShoppingTracker/

Here is the look of the App.myshop