Accessing JSON data using Restful Services in AngularJS

Before we dive into the process of accessing JSON data using Restful services in AngularJS, lets look into the basics in brief.

What is a Web service? It is a service which makes all the resources available. The main terms come around when people talk about web services are REST and SOAP.

REST is a web architecture which usually deals with plain text, JSON and XML, It mostly uses HTTP protocol for communication. There are usually 5 methods used in this HTTP and are famously known as HTTP verbs – GET, PUT, POST, PATCH, DELETE.And REST is widely preferred because it has no web service definition.

REST vs Restful: The systems which are bound to REST terms are known as Restful.

SOAP is a protocol which deals only with XML data and is usually considered to be more secure when compared to other protocols. It depends on WSDL for web service definitions.

JSON: It is a format of data representation which is a collection of name-value pairs. It is easier for data exchange when compared to other data formats like XML.

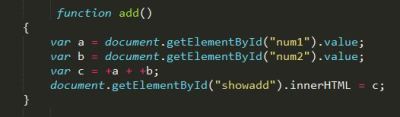
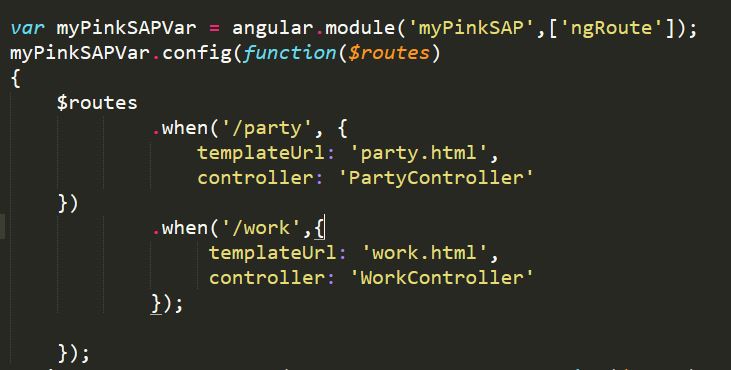
So when we want access this JSON data using a Restful service we need use $http.get() method in a controller. My app and controller looks like below-

restctrl

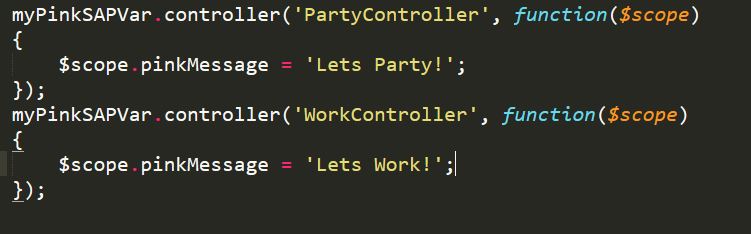
In the above screenshot, my module has no dependencies, hence the []. And it has a controller called ‘myPinkCtrl’.The controller takes two arguments $scope and $http, this $http makes use of one of its verbs called get to access the data from myJSON.json file(typically it is the url of the file you want to read) and also uses .then() method which returns a promise( we can also handle errors in this method) . So what ever .then() returns is stored in  a variable called personJSON and it is bound by the $scope.

This completes the controller part, lets look into our JSON file, which looks like below screenshot.

restjson

As we know JSON hase name-value pairs, name & work are the name and their values are Sirisha & webdeveloper respectively.

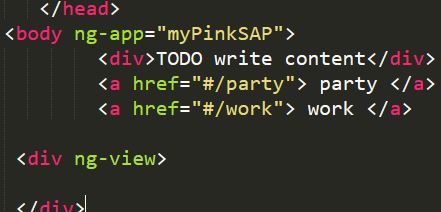
The HTML file looks like the below screenshot,

resthtml.JPG

The application is auto bootstrapped by using ng-app and the controller is mentioned by using ng-controller directive. The data is bidden using expressions i.e., {{ }}

The whole application can be found in this link: https://github.com/sirishagavini/Rest-Webservices-with-AngularJS

Single Page Application using AngularJS

A Single Page Application is what everybody want their web app to be these days, So, What is SPA exactly? It is a web application technology where  everything will be in a single HTML page with different routes provided in the module. it has many features like no page reloads, caching all the data, changing only needed data on a page dynamically,high level scaling.

This can be done by proving routes for each HTML page and the condition to satisfy in order to view the HTML page. The templateUrl of each route can also be given at the route and one can also be associated with each controller or same controller. Let us see this with an example,

SPA5

In the above example, myPinkSAP is my module. What is a Module? It is the one where all the services, directives, controllers are stored in. And I have associated this module with a variable name called myPinkSAPVar. Now, the variable is used to configure our routes by injecting provider. And the module has a dependency of ngRoute. The syntax of it is – .config(function(injectables) 

templateUrl and controller are the functions which returns the URL of the page we want to route and the controller we want to associate the page with.

All the business logic can be written in controllers, it can be written by having a $scope injected to the function. This scope can be used to add behavior to the controller, in this example I have created two different controllers – PartyController and Work Controller which display data associated to $scope.

SPA2

All the above code is written in a JavaScript file, this .js file included in a <script> tag in HTML page in which  angularJS  and angularJS-route is imported. This can be done as below-

SPA3

To associate this HTML tag with the module, use ng-app directive and use anchor tag to link the .html pages to the page. To view all the .HTML pages associated in a page use ng-view directive. One can use partial views to make it efficient.

SPA4

Simple, run the HTML code and view it to view your application. The whole code can be found here – https://github.com/sirishagavini/AngularJS—Single-Page-Application-

Being M.E.A.N is good! (MongoDB, Express, AngularJS, Node.js)

How on Earth, it can be a good thing when someone is being MEAN? In Web developing world, being M.E.A.N can take a web application to a whole new level. Well it is an acronym of MongoDB, Express, AngularJS, Node.js. It is nothing but using AngularJS on client side and Node.js platform with Express framework on the server side and having MongoDB as the database. But what is so special about bring MEAN stack when there are tons of web technologies of building a web app, M.E.A.N is special in its own way of being flexible in terms of Scalable and providing good quality for the web app.

MongoDB: It is  a NoSQL document database, it is a non-structured database where documents will be stored in JSON (easily parsed), which will be internally represented in a BSON format to support extra datatypes like BinData type.

      Wait, what is BSON?  It is a Binary JSON, a binary serialization format used to store documents.

      Why BSON? It is helpful in encoding and decoding the data in a better way.

Express: Express is a Node.js web application framework, which is known for its robustness for building web and mobile applications, data integrations and . There are many Node.js frameworks like hapi.js , koa.js, Mojito and many other frameworks but Express is widely chosen by many web application developers.

AngularJS: It’s been a blessing to all web developers since its release. It helps in avoiding writing thousands of lines of code and allows to write it in MVC (Model View Controller) . It has many features like data binding, dependency injection, directives, filters and many more. It is used as a front end (Client Side) in the MEAN stack. It makes AJAX calls to retrieve data from the API, as the data is in JSON format it is very easy to retrieve the data to the front end.

Node.js: It is used to build  server side web applications with scalability and cross-platfrom compatability.  Best part of Node.js is its support for Single Page Applications, it never waits for an API to retrieve a data which makes it that it will never buffer. It is on Server side of the application usually with Express framework.

Testing: We can run simple task runners like GRUNT or GULP to test by running the test scripts but it also many testing frameworks like Karma, Mocha are available for testing MEAN Stack.

Using MEAN is still a naive practice as it need some bold migration from a traditional practices of storing data and accessing it from the server but it is slowly getting into the big race, many big Organizations like Netflix, Paypal use MEAN stack.


JavaScript Bubbling explained!

Bubbling in JavaScript is just like a parent- child relationship, when you click a child which is nested in a parent tag, it gets the events from the upper nested tag till the end nest tag is reached.

Let me explain this simple connection with an example-

Once upon a time, there lived a prince and princess from two different countries. Prince has traveled from a very long distance to see the princess. Now, what would he does when he wants to meet a princess in the castle? As it is a castle, he cannot meet her directly.

castlecode

So, he first lets know the guard that he wants to see the princess, by clicking the below tag –Div1

guard

Though the guard lives in the same castle, he by himself cannot meet princess in person, So, he would just let one of the maids in the castle to convey the message, by automatically  clicking the below tag –div2

maid

And now the maid lets the princess know that the prince has arrived to see her, by automatically clicking the below div tag and finally, prince and princess meet.

div3

finallyAll that the prince has to do is to click on the guard tag and that automatically alerts the princess tag. This is simply explains the bubbling effect!

To see how the code works go to –  https://github.com/sirishagavini/JavaScript-Bubbling

10 Simple Tricks for a Web Developer

There is a saying that “No matter it is either Ballroom or Battlefield, Princesses always be prepared before entering into it“, similarly, every web developer must be prepared by knowing the pros and cons before writing a code. Here are the few tricks which will be helpful in the preparation –

  1. Always put <meta> tag with viewport element and set the content as “width=device-width, initial-scale=1.0“, this comes in rescue if the site has been opened in any device like mobile phone, ipad and initial scale is for zooming purpose.
  2. <!DOCTYPE html> is necessary for every HTML page, this make a page valid and also tells the web browser that what kind of document to load.
  3. CSS should always preferred to be external if a change has to be done to multiple pages because it reduces the load time and file size also can be reduced. The priority of the inline, internal and external CSS  is in increasing order.
  4. Whenever code doesn’t work, always debug it using console, short cut for console is Ctrl+Shift+J , this seems to be a super hero for many programmers. Sometimes, all you need to do is just refresh the page, to see the changes.
  5. Minify the code as much as possible, this helps in communicating with  a server and loading a page pretty faster. This is just achieved by removing extra spaces and extra lines, there are many online tools for this job.
  6. Whenever you write a JavaScript code, always check the code in JSHint or JSLint, this helps in saving time and also knowing the errors pretty easier way.
  7. While writing a  jQuery code, using noConflict() to have a customize variable in the place of regular $ or long jQuery will be helpful in letting $ be used in other scripts. For example, AngularJS uses $ for scoping variables inside controllers.
  8. Use JavaScript Task Runners, generally people use GRUNT or GULP for this. This just automates all the process of minifying, linting, testing a code.
  9. Always make your website responsive, these days people equally use their mobile phones or ipads like they do use a computers. @media queries in CSS3 will be very helpful in scaling a website by setting minimum or maximum width or height.
  10. Between id and class, tags with id have more priority than with class. There can be many tags with same class but there should be only one tag with an id.

Princess Party Checker with AngularJS, HTML, CSS

Every girl is a princess and every mundane day can be special if you dress better. So we can choose better option by comparing better. But  don’t worry, the princess party checker is finally here. This simple party checker app, helps every girl to check how  a dress, nail paint and lipstick looks like. Lets see how this app can be created.

All I used is AngularJS, HTML and simple CSS. All this has to be within <form> </form> tags. All I used is AngularJS forms,  there are three types of data in forms – text, input, select.

  • Text: This is just a text box, we can enter our text here.
  • Input: This input field can be of many types like radio, check box. I have implemented these two types in the form.

          Radio:  Radio is used to check color of nail polish. The syntax is like below –PinkNail 
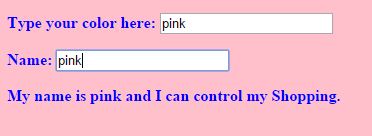
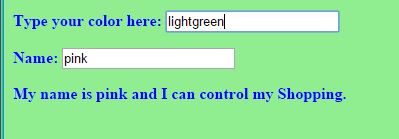
I I I have used ng-switch to show only one data at a time, this is just like a switch case in java. And case is given ng-switch-when and the data given is shown here.PinkNailSwitch

Check box: Check box is used to check the dress, The syntax is like below –PCCheckbox

The input data can be shown as below, I have modified the text color according to the nail color.PCBallGown

  • Select: I have used this using an array and this array is created in a function which is in a controller called PinkFormCtrl. PCAngular

This scope is binded with selection element and can be shown in the HTML tag.  I have used ng-options  in the select tag,  that’s fine but what is the value for it :  ” lipStickColor for lipStickColor in lipStickColors“. What on earth is this? Simple, the first lipStickColor is label, second lipStickColor is value  and lipStickColors is the array. It just looks a label for the value in the array.

PCSelect

The complete code can be found here:  https://github.com/sirishagavini/AngularJS-Party-Checker

And finally the app looks like below –

PCDress.JPGPCNail

Lets fly some princess balloons with jQuery’s animation & call back functions

Well, it is our princess birthday and she has some pink balloons, lets help her in flying the balloons.

jQuery : This library is a bliss since it has been released, it is a larger framework which helps in avoiding large lines of code for an event to happen. It makes pages dynamic. It initializes, loads, manipulates DOM elements and  also does  uses AJAX to interact with server to get a information. Here we are going to use animate()  and callback()  functions to fly these balloons. But what are they.

jQuery can be downloaded and place it in the same folder of the HTML file or can be imported to a HTML file by using a link to its library like below:

importjqueryanimate(): This method helps in animating a set of selected elements. All these animations can be customized based on our interests. The syntax can be like:

.animate( properties [,Speed] [, callback function])

Properties: Based on which animation will move toeards (left, right, top, bottom)

Speed: How fast the animation can be done(Slow, fast). This can also be expressed in milliseconds too.

Callback Function(): jQuery’s beauty lies here, it allows to call a function within a function.

The jQuery code can be written within script tag or can be written in a .js file.

An example code is something like below.

pinkjquery

In this context, we have animated the balloons to move towards bottom for 20px and 3000 is the duration for the animation. We are flying the balloons first towards bottom and then with call back function we are moving it towards left for 750px with 3000msec speed and again towards left for 250px in 2000msec.

The output is soemething like below:

IwiishPinkBalloon

The working of this code can be viewed here: https://jsfiddle.net/sirishagavini/xc4s2g18/


Data Binding and Changing color of a page using AngularJS

AngularJS, wherever we go this word is heard innumerous of times. There is no wonder in it being this famous, it helps developers to avoid repetitions of code, extends the HTML code What is it? What does it to? How does it work?

Let me answer these questions in a simple one word answers-

What is it? It is a JavaScript framework.

What does it to? It allows to write code in MVC (Model View Controller) . It has many features like data binding, dependency injection, directives, filters and many more.

How does it work? Let us see how one of the features the data binding works and how can we change the color of a page.

Add AngularJS to a HTML page by giving the below link as src to the script tag:

http://ajax.googleapis.com/ajax/libs/angularjs/1.4.8/angular.min.js&#8221;

Now we need to learn about ng directives, it is AngularJS directives, which are used to load an app, controller, bind the data with HTML.

Let us discuss briefly about the directives used in this page color change app.

ng-app : ng-app helps to connect the AngularJS to the HTML. It can be given to HTML tag or any div tag and it can be defined using var appname = angular.module(‘appname’,[]); here appname is the name of the app and  [] is for dependency injection, if it is empty then the app doesn’t have any dependencies.

ng-controller :  ng-controller connects the controller to the HTML. It can be defined using appname.controller(‘controllername’, function(){}); . Here the controllername is the name of the controller and the function can be declared inside the controller as anonymous or can be declared outside with a name and pass the name to the controller.

This controller code can be written within a script tag or any new js file. This directive can be given to body tag or any div tag.

ng-model: This directive helps in databinding. This is a way to take the data from the HTML tags like <input> and bind it to a variable. Ex: <input type=”text” ng-model=”variablename”> . This data in ng-model can be passed using ng-bind.

ng-bind : The data stored in variable of ng-model can be passed in ng-bind. The alternative for this is expressions {{ }}.

ng-init: This is used to initialize a variable. This can be passed in any html tag. In this example I initialized it to pink first.

The complete code for this app can be found here: https://github.com/sirishagavini/AngularJS–Changing-color-of-a-page

The output looks like –

Angy1 Angy2 Angy3

Simple Calculator with JavaScript and the Sassy SASS

Lets learn how to make a simple calculator with JavaScript and style it with SASS.
What we can do with this Simple calculator is add, subtract, multiply and divide.
The beauty of javascript lies in its simplicity, the code for all the actions(add, sub,mul,div) used here is pretty much same. So, lets see the code of one of the actions –

jsadd

document.getElementById(“”)

Here num1, num2 are the id’s for the input tags where we give the two integers as input. and .value helps to take the input values and .innerHTML helps to show the value in “c” at the html tag with id”showadd” as below.

jsaddhtml

Why + in front of variables a and b in var c =+a + +b;

Because, the variables a and b were strings before and with + they are converted to integers.

Linking HTML to CSS:

jsaddcss

Wait, CSS? But you said with SASS . Yes we always link the HTML with CSS. Infact it is the styling language which HTML understands. SASS is one of the CSS prepocessors and it’s files will have.sass extension. So, now we need to compile our .sass file to .css and link them as above, this can be done using many tools, I used Koala.

Here is the SASS code and the converted CSS code respectively:

jsaddsass

jsasscss


The final app looks like:

SimpleSassyCal

Converting a PSD file to HTML, CSS

Converting a PSD(PhotoShop Document) to HTML, CSS, all we have to do is slicing and converting. All this might be confusing but yes that is all we have to do.

First, we need to have a PSD file.But how to do we get that? Its simple, we can create one by ourselves in Adobe Photoshop or any other comfortable editor. Try to add more layers, images and represent text in different formats, this will be helpful in getting more experience.If you could not find anything in the first place, do not panic  but just explore it more and more, you will definitely find a way (Remember, no one can teach you better than you do to yourself) .

So, now we have our PSD file ready. Now we have to open a IDE like Net beans or Eclipse. Create empty HTML and CSS files so that we can add code for the items we have sliced in the PSD.

Slicing a layer in Photoshop

This can be done in PhotoShop by using Slice Tool. Just select a part of the PSD you want to replicate in the browser page and save it in an image format (JPEG, PNG) .

psd1

Converting to CSS Code

If it is a background and it goes like a banner like shown above, then the CSS can be like body to use repeat-x  to repeat the background image along x-axis, if it is just an image then CSS can be like #nav

psd2

Selecting a text in PhotoShop

Select Horizontal Type Tool and click on the paragraph and it allows to copy the text and this text can be posted in the HTML file. This text can be placed in a <p> tag, there are many alternatives for  this tag. Choose the best tag which meets your requirement.

psd3

Replicating Image from PhotoShop to HTML

If you have a image to replicate then put the image in a new folder in the project in IDE. (In this example, imageresource is a folder) .now, give reference to the image as below in the HTML file.

psd4

Tip: Refresh the browser to see the changes effected after every single change done to the code. This helps to keep track of any mistakes.

Simple, This way you can convert a PSD file o HTML file 🙂