Angular Directives and its Scope

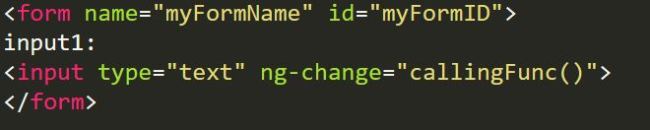
Directive, what is the purpose of having a directive in our code?

For instance, I want a Vehicle to travel and I have all the parts required for that like tiers, bolts, body and other needed material, so I would just assemble them and use it whenever I need. Else it is a nightmare to assemble the car each time I need to go out.  Similarly, I have a functionality bound within a directive and reuse it wherever I need it in my application like  Angular builtin directives ng-bind, ng-init, ng-app and many more.

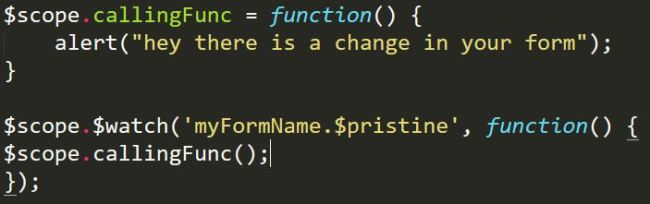
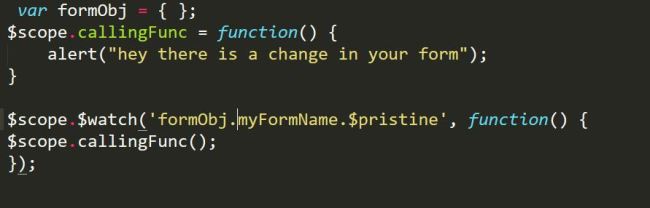
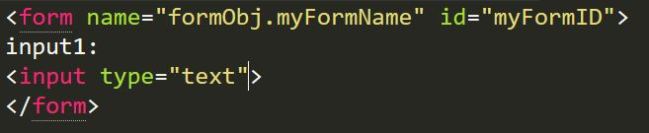
Angular also allows to create our own directives with any name we like. So we can have a custom directive with a scope variable, however it is optional to define scope inside a directive. If we skip mentioning scope, it gets default with false. There are mainly 4 ways to define scope of the directive-

a) scope: false

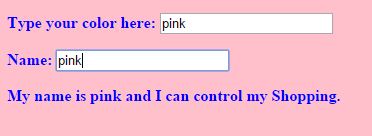
It just shares the scope with controller, that is when a change made in directive, it reflects in controller and other directives as well.

Example: Close friend, who shares everything.
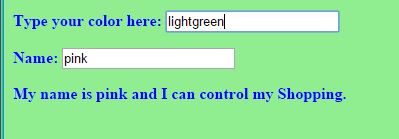
b) scope: true

It inherits the scope from controller acting as its child, that is a change in directive, do not reflect in controller or other directives.

Example: greedy friend, who do not want to give his stuff to others but would take from them.

c) scope: {}

This is known as isolated scope, which completely isolates scope from its parent directive, and do not inherit anything from parent and do not share anything out as well.

Example: Real quite friend, who do not take or give from others.

d) scope: { var1: ‘=’,    var2: ‘&’,   var3: ‘@’,   callVar4: ‘&dirVar4’ } 

This is the best practice of all, which helps us to choose what variables should be visible to outer world and what not. In this case, only the variables or functions that are mentioned within { } are allowed to communicate with controller and changes for these variables made in directive will reflect in controller and other directives as well.

Example: Work Friends, who shares stuff that are important to work but not random unnecessary stuff.

var1: ‘=’ – It allows two way binding for scope variables,

var2:’@’  – It is for string variables

var3:’&’ – for accessing methods that are in controller

callVar4:’&dirVar4′ –  same as above method but for giving new name for method in controller.

This is very vast subject to discuss but above details give a precise knowledge required to dive into the details of directives and scopes.

Angular Way to $watch HTML Forms using $pristine

So, I have an HTML form and whenever there is a change in it I want to perform an action, there are two ways to do the monitoring in Angular-

a) Using ng-change in the input fields and calling the function to perform if form changes.

This way is pretty easy and that’s okay when there are like 5 input fields in a form, all we need to do is to put ng-change in each field. But what if there are 100 input fields in a form, it is takes heck lot of time to put ng-change for each of the 100 input fields. So, it is good only for less number of fields not for more.

ngchange

b) Using $watch in the controller, to check for the form changes using $pristine in the form. 

The $watch way is my favorite, all you need to do is to use a simple $watch in the controller in order to detect the changes in it. Here is the way to do it,

Lets take the same above example and take off the ng-change from it, your controller should look like something below –

watchingforms

But this wouldn’t work, why everything seems to be right?   The above code has a mistake, what is it? So for example, I came from a place where there is a local famous guy called – “Sid Smith” and I went to my friends place to attend a party, there I have been taking Sid Smith’s name constantly and my friends were able to relate to this guy called Sid but not the strangers. So there should always need to be local reference in order to able to make a conversation.

Here we had similar situation, we need make a local reference in controller in order to understand which form is it, all we need to do for that is create an empty object in controller.


correctform

and the HTML should look like below –

corectformhtml

That’s all, here the watch is checking form constantly if the form is $pristine or no and calls the function whenever there is a change in the form.

Now you know, NPM – Node Package Manager

So, I always used to wonder in my early stages of using NodeJS, why I hear alot of npm whenever I hear about NodeJS? As I dig into the details of npm with NodeJS, I found that it is so important for every JavaScript programmer who works in groups.

But how does that help?  npm has been a time savior for many JavaScript programmers by not letting them to replicate their work, as it allows them to share a piece of code between them in the means of package. So, the piece of code that can be shared is called as package/module.

All the basic details you might have to know about NPM:

  1. The code can be shared with the team by writing the code in a file with .js extension, example: random_name.js
  2. Once a developer shares the package with his team, his teammates can also check for the new versions on the package.
  3. The meta data of the package can be included in a .json file, typically called as package.json file.
  4. A package can be installed locally or globally. Typically one installs globally (tags with -g to regular commands) when it is used outside the project you are currently in like command line. When you want to use it within your project then it should be installed locally and can be accessed in the file by mentioning in require(‘package_name’)
  5. One can uninstall a package from the node_modules at any time if the package is no longer needed.

What is package.json:

  • package.json is a file which can be used to install the packages with a command npm install. 
  • The attributes are name, version, dependencies, devDependencies, author, contributors and many other.
  • name: package name
  • version: package version (if ^ is included in front of it then it looks for equal or greater than the current version)
  • dependencies: any dependencies with the package can be added.
  • devDependencies: the dependencies which are useful only in develop and testing environments can be added here, like testing tools etc.
  • author: creator of the package.
  • Other way to add dependencies is by using –save in command line. Syntax would look like, npm install <package_name> –save

General npm commands:

  • npm ls: To see all the packages (-g for global packages)
  • npm init: To start a package.json file
  • npm update: To update all the packages
  • npm install <package-name>: To install a particular package (npm install -g <package-name> for global packages)
  • npm install: To install all the latest version of packages listed in the dependencies
  • npm install <package-name> –save: To add dependencies in command line
  • npm config set prefix ‘~/.xxx’ : To configure npm teh prefix (the directory)
  • npm get prefix:  To know the location where it has been stored.
  • npm outdated: To see all the version updates on the packages.
  • npm search <pakage_name> : To search a package
  • npm uninstall <package_name>: To uninstall a package (add –save to remove completely from the dependencies)

Simple overview of AngularJS $watch

AngularJS is being widely used these days, it is used to do in-numerous number of tasks, it is hard for it to keep track of all the elements, so it has to get a way to let few particular elements that needs to be tracked for changes. So Angular has watchers to keep track of all elements that needs to be tracked down, these elements can either be variables, objects, outputs of a functions etc but how to know which ones are to be tracked and which one’s not, this can be done either by using {{varname}} or by associating  the variable with $watch .

Syntax: $scope.$watch(watchExpression, listener);

a)  Where  watchExpression is the expression that needs to be watched, this can be an array or object or function.

b) listener is a function that would be called whenever there is a change in the expression. The listener can be of two types-

i) It can be just a function that have no parameters, this can be

ii) It can have parameters that needs to be compared with a new variable that is created like – syntax:  function(newVar, oldVar)

Examples:

1) When we have a bunch of pink flowers in a vase, we usually check the freshness of flowers from time to time and change the flowers when they have started fading out the color.

angularwatch1

Here, flowers are the watchExpression  and the act of changing flowers is the listener, whenever there is  a change in flowerColor, the changeFlower() is called.

2) When we go to pick Chrysanthemums, we pluck them when they have come for blossom but not in the bud.

angularwatch2

In the above example, blossom is the “new value” and bud is the “old value” of the flowerStage variable, so when flowerstage has been moved from bud to blossom, we perform the action of pluckFlower()

3) When there is a pot of water for certain level let’s say at 10, if the level of water goes down due to sun or any other reason we need to water it else if the level of water goes up we need to take out the extra water. This can be done as follows-

waterlevel

ng-class conditional assignments in detail in AngularJS

ng-class is a directive that allows one to setting class/classes on an HTML element based on an expression evaluation. This ng-class directive can also be represented as ngClass (camel case).

These expressions can either be an object({}) or a string or an array ([])

There are various types of class assignments based on the conditions we give to evaluate, lets see few of the ways to do so-

  1. Simple class assignment:   ng-class=”classname”
  2. Simple array assignment:   ng-class=”[class1, class2, class3]’
  3. Simple object assignment: ng-class=”{classname: value}”

So, now lets see how to assign conditional classes:

  1. Single condition assignment: Here, we assign a class if a name equals to a value then it meets a condition.
      Syntax: ng-class=”{classname: name==’value’}”
    For example, if a child chooses chocolate color then he must go to  brown class and it is represented as below-
    Example Syntax:  ng-class=”{ brown: child == ‘chocolate’}”
  2. Multiple condition assignment:

          a) Here, we check for a condition for name, if it equals to value1 then class1 is assigned else if it is equal to value2 then it gets assigned to                           class2.
Syntax:
ng-class=”{class1: name==’value1′,  class2: name==’value2′, }”
For example, if a child chooses chocolate color then he must go to  brown class and if he chooses strawberry then he must go to pink class,                    it is represented as below-
Example Syntax:  ng-class=”{ brown: child == ‘chocolate’, pink: child == ‘strawberry’}”

          b) Here,we check for a condition for [name], if it equals to value1 then class1 is assigned else if it is equal to value2 then it gets assigned to                       class2.
Syntax:  
ng-class=”{value1: ‘class1’, value2: ‘class2’, }[name]”
For example, if a child chooses chocolate color then he must go to  brown class and if he chooses strawberry then he must go to pink class,                    it is represented as below-
Example Syntax:  ng-class=”{chocolate: ‘brown’, strawberry: ‘pink’, }[child]”

          c) Here, we check for a condition for [name] if it equals to value1 then class1 is assigned else then it gets assigned to class2.
Syntax:  
ng-class=”{true: ‘class1’, false: ‘class2’, }[name == value1]”
For example, if a child chooses chocolate color then he must go to  brown class else he must go to pink class, it is represented as below-
Example Syntax:  ng-class=”{true: ‘brown’, false: ‘pink’, }[child== ‘chocolate’]”

          d) Here, we check for a condition for [name] if it equals to value1 then class1 is assigned else then it gets assigned to class2. (? is equivalent to ‘if’ and : is equivalent to ‘else’)
Syntax:  
ng-class=”name == ‘value’ ? ‘class1’: ‘class2’”
For example, if a child chooses chocolate color then he must go to  brown class else he must go to pink class, it is represented as below-
Example Syntax: ng-class=”child== ‘chocolate’ ? ‘brown’: ‘pink’”

Promise in AngularJS

Promise: It is an interface for interacting with an object that represents the result of an action that is performed asynchronously, and may or may not be finished at any given point in time.

According to the AngularJS’s standard API Reference documentation,  promise API is to asynchronous programming what try, catch and throw keywords are to synchronous programming. So, it is basically meant for better error handling.

Let’s make it Simple and Short, the Promise basically makes use of a $q which is a service in ng module. So there are totally two possibilities for the Promise, it can be resolved  and rejected. The resolved/rejected promise will get back the data/error that needs to be used by a function in the controller. So basically the practical use of  a promise is to make asynchronous possible.

Angular implements promise by using .then() function, which takes two functions as arguments, the former is for success and the later is for error (sometimes optionally it takes notify() as an arguments). This can be illustrated by simple real time example as below-

Let us take a scenario that there are two friends who wants to make strawberry milkshake and they have strawberries, cream and honey ready but when they look into their refrigerator they found that they are out of milk.

So, one of the friends promise the other that he would get the milk from the grocery store, while the other friend would not sit idle while he waits for his friend to get the milk, instead he asynchronously would slice the strawberries and make all the arrangements necessary for making the strawberry milkshake.

Now, there are two possibilities for the promise made by one of the friends – it can be  resolved or rejectedIf there is milk available at the grocery store and he can get it to his friend who is at home then the promise has been resolved and if for some reason he could not get the milk and returns empty hand then it means that the promise has been rejected.  And this function uses getMilk() service provided by the other friend.

MilkshakeNew

So here, if the promise has been resolved, the friends implement drinkMilkshake() else if the promise has been rejected they just eat fruit salad by implementing eatFruitSalad() method.

The promise in the getMilk() service looks like below –

milkNew

References:

http://wiki.commonjs.org/wiki/Promises

https://docs.angularjs.org/api/ng/service/$q


Accessing JSON data using Restful Services in AngularJS

Before we dive into the process of accessing JSON data using Restful services in AngularJS, lets look into the basics in brief.

What is a Web service? It is a service which makes all the resources available. The main terms come around when people talk about web services are REST and SOAP.

REST is a web architecture which usually deals with plain text, JSON and XML, It mostly uses HTTP protocol for communication. There are usually 5 methods used in this HTTP and are famously known as HTTP verbs – GET, PUT, POST, PATCH, DELETE.And REST is widely preferred because it has no web service definition.

REST vs Restful: The systems which are bound to REST terms are known as Restful.

SOAP is a protocol which deals only with XML data and is usually considered to be more secure when compared to other protocols. It depends on WSDL for web service definitions.

JSON: It is a format of data representation which is a collection of name-value pairs. It is easier for data exchange when compared to other data formats like XML.

So when we want access this JSON data using a Restful service we need use $http.get() method in a controller. My app and controller looks like below-

restctrl

In the above screenshot, my module has no dependencies, hence the []. And it has a controller called ‘myPinkCtrl’.The controller takes two arguments $scope and $http, this $http makes use of one of its verbs called get to access the data from myJSON.json file(typically it is the url of the file you want to read) and also uses .then() method which returns a promise( we can also handle errors in this method) . So what ever .then() returns is stored in  a variable called personJSON and it is bound by the $scope.

This completes the controller part, lets look into our JSON file, which looks like below screenshot.

restjson

As we know JSON hase name-value pairs, name & work are the name and their values are Sirisha & webdeveloper respectively.

The HTML file looks like the below screenshot,

resthtml.JPG

The application is auto bootstrapped by using ng-app and the controller is mentioned by using ng-controller directive. The data is bidden using expressions i.e., {{ }}

The whole application can be found in this link: https://github.com/sirishagavini/Rest-Webservices-with-AngularJS

Data Binding and Changing color of a page using AngularJS

AngularJS, wherever we go this word is heard innumerous of times. There is no wonder in it being this famous, it helps developers to avoid repetitions of code, extends the HTML code What is it? What does it to? How does it work?

Let me answer these questions in a simple one word answers-

What is it? It is a JavaScript framework.

What does it to? It allows to write code in MVC (Model View Controller) . It has many features like data binding, dependency injection, directives, filters and many more.

How does it work? Let us see how one of the features the data binding works and how can we change the color of a page.

Add AngularJS to a HTML page by giving the below link as src to the script tag:

http://ajax.googleapis.com/ajax/libs/angularjs/1.4.8/angular.min.js&#8221;

Now we need to learn about ng directives, it is AngularJS directives, which are used to load an app, controller, bind the data with HTML.

Let us discuss briefly about the directives used in this page color change app.

ng-app : ng-app helps to connect the AngularJS to the HTML. It can be given to HTML tag or any div tag and it can be defined using var appname = angular.module(‘appname’,[]); here appname is the name of the app and  [] is for dependency injection, if it is empty then the app doesn’t have any dependencies.

ng-controller :  ng-controller connects the controller to the HTML. It can be defined using appname.controller(‘controllername’, function(){}); . Here the controllername is the name of the controller and the function can be declared inside the controller as anonymous or can be declared outside with a name and pass the name to the controller.

This controller code can be written within a script tag or any new js file. This directive can be given to body tag or any div tag.

ng-model: This directive helps in databinding. This is a way to take the data from the HTML tags like <input> and bind it to a variable. Ex: <input type=”text” ng-model=”variablename”> . This data in ng-model can be passed using ng-bind.

ng-bind : The data stored in variable of ng-model can be passed in ng-bind. The alternative for this is expressions {{ }}.

ng-init: This is used to initialize a variable. This can be passed in any html tag. In this example I initialized it to pink first.

The complete code for this app can be found here: https://github.com/sirishagavini/AngularJS–Changing-color-of-a-page

The output looks like –

Angy1 Angy2 Angy3