Keep It Simple-3: Selectors, Psuedo-Classes and Pseudo- Elements

In my starting days of web development, I used to see Selectors, Pseudo-Classes and Psuedo-Elements as a super complex topics in CSS. But when I realized that I have been using them in many places without knowing the fact that these are the ones which I am always skeptical to understand.

Prior to knowing about Pseudo-Classes and Psuedo-Elements we need to understand what Selectors are first. And again knowing these basics in deep will be helpful for us upfront to write the CSS elements in a better way within less number of lines.

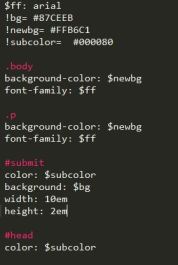
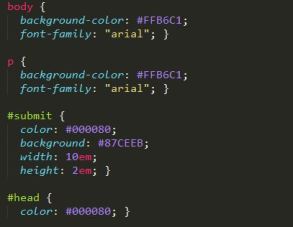
Selectors are the ones which helps us in selecting the elements belonging to a same category. The category could be based on elements with same #id or .class or attribute value([attr = value]) or element name(<>) or simply select all (*)

Pseudo-Classes are the ones which sub-categorize the elements belong to a same category ( i.e., Selector) based on the state of the elements or position of the elements or other properties like :not, :required, :checked etc. Pseudo-Classes are the ones which are identified by semicolon, so you will notice that there will be a semicolon( : ) in front of each pseudo-class.

pseudoClassesNew

If we do deeper in pseudo-classes based on state of elements, there are :link, :visited, :hover, :active and the order of these classes(LVHA) is important because there are properties common in all the 4 classes and will not work as expected if we change the order. (take a basic element and write CSS with these 4 elements and try changing the order and see what happens)

Pseudo-Elements are the ones which goes much deeper in categorizing the elements belong to a same category( i.e., Selector) and this allows to style part of an element like ::first-line, ::first-letter, ::selection or even adding a content ::before or ::after an element. Pseudo-Elements are identified by double semicolon, so you will notice that there will be a double semicolon( :: ) in front of each pseudo-class. (This was : in CSS1 and CSS2)

pseudoElements

Keep it Simple- 2: Pass By Reference Vs Pass By Value

Pass By Reference Vs Pass By Value, which of these two JavaScript follows? Well JS is pretty good at handling both the pass by reference and pass by value. Let’s look into the basic definition of both the methods first and then dig into How JS uses these methods.

Pass By Reference: Imagine, you and your friend are on a same boat and you want to reach somewhere, if the boat has reached the other end of the river then both you and your friend will also been reached. So, one’s status is affecting other’s status.

xophcjaathopsououswi

Pass By Value:  Here each will be sailing in their own boats, so if one boat has reached the other end of the river, it doesn’t mean that other boats had also reached the end. So, here one boat is independent on other boats.  31863404-Иллюстрация-Благодаря-kids-пробуя-различные-водные-виды-спорта

How JavaScript is handling both the methods?

JS follows pass by reference  in case of objects and arrays i.e., if they are passed to a function and the values inside the function are assigned to a new value then it does affects the original value as well.

passByRef

It follows pass by value in case of variables like  boolean, string, number i.e., if they are passed to a function and the values inside the function are assigned to a new variable then it doesn’t going to affect the original value.passByValue

Keep It Simple -1: Five Simple Facts of Sort() in VanillaJS

It is always a good idea to get a strong knowledge on basics. We have many ways to sort elements in most of the JavaScript frameworks in angularJS, react JS etc., here lets see how it is done in Plain/VanillaJS.

In JavaScript, sort() always tries to put elements in ascending or alphabetical order if none specified. Here are 5 basic and simple facts about sort() in plain JavaScript-

  1. It sorts the elements with same special characters as expected
    Ex: [‘$5’, ‘$1’, ‘$2’] gives $1, $2, $5 
  2. When same element with different characters are in array then it sorts according to the special char but not based on the digits.
    Ex: [ ‘$3’, ‘*4′,’@1’, ‘&2’] gives $3, &2, *4, @1
  3. It doesn’t sort elements with different number of digits.
    Ex: [1,2,10,3] gives 1,10,2,3
  4. When an empty string is involved with numbers and alphabets, it always puts the empty string at first, then numbers will be sorted in ascending order and then strings will sorted alphabetically.
    Ex: [‘bananas’, ‘apple’, ”,1, 5] gives  ,1,5,apple,banana
  5. If an array has negative numbers involved with positive numbers, it just considers negative numbers together and tries to sort them ascending without considering ‘-‘ and then sorts positive numbers.
    Ex: [1, -15, -1, -3, 2, -2] gives  -1,-15,-2,-3,1,2

Angular Way to $watch HTML Forms using $pristine

So, I have an HTML form and whenever there is a change in it I want to perform an action, there are two ways to do the monitoring in Angular-

a) Using ng-change in the input fields and calling the function to perform if form changes.

This way is pretty easy and that’s okay when there are like 5 input fields in a form, all we need to do is to put ng-change in each field. But what if there are 100 input fields in a form, it is takes heck lot of time to put ng-change for each of the 100 input fields. So, it is good only for less number of fields not for more.

ngchange

b) Using $watch in the controller, to check for the form changes using $pristine in the form. 

The $watch way is my favorite, all you need to do is to use a simple $watch in the controller in order to detect the changes in it. Here is the way to do it,

Lets take the same above example and take off the ng-change from it, your controller should look like something below –

watchingforms

But this wouldn’t work, why everything seems to be right?   The above code has a mistake, what is it? So for example, I came from a place where there is a local famous guy called – “Sid Smith” and I went to my friends place to attend a party, there I have been taking Sid Smith’s name constantly and my friends were able to relate to this guy called Sid but not the strangers. So there should always need to be local reference in order to able to make a conversation.

Here we had similar situation, we need make a local reference in controller in order to understand which form is it, all we need to do for that is create an empty object in controller.


correctform

and the HTML should look like below –

corectformhtml

That’s all, here the watch is checking form constantly if the form is $pristine or no and calls the function whenever there is a change in the form.

JavaScript Bubbling explained!

Bubbling in JavaScript is just like a parent- child relationship, when you click a child which is nested in a parent tag, it gets the events from the upper nested tag till the end nest tag is reached.

Let me explain this simple connection with an example-

Once upon a time, there lived a prince and princess from two different countries. Prince has traveled from a very long distance to see the princess. Now, what would he does when he wants to meet a princess in the castle? As it is a castle, he cannot meet her directly.

castlecode

So, he first lets know the guard that he wants to see the princess, by clicking the below tag –Div1

guard

Though the guard lives in the same castle, he by himself cannot meet princess in person, So, he would just let one of the maids in the castle to convey the message, by automatically  clicking the below tag –div2

maid

And now the maid lets the princess know that the prince has arrived to see her, by automatically clicking the below div tag and finally, prince and princess meet.

div3

finallyAll that the prince has to do is to click on the guard tag and that automatically alerts the princess tag. This is simply explains the bubbling effect!

To see how the code works go to –  https://github.com/sirishagavini/JavaScript-Bubbling

Simple Calculator with JavaScript and the Sassy SASS

Lets learn how to make a simple calculator with JavaScript and style it with SASS.
What we can do with this Simple calculator is add, subtract, multiply and divide.
The beauty of javascript lies in its simplicity, the code for all the actions(add, sub,mul,div) used here is pretty much same. So, lets see the code of one of the actions –

jsadd

document.getElementById(“”)

Here num1, num2 are the id’s for the input tags where we give the two integers as input. and .value helps to take the input values and .innerHTML helps to show the value in “c” at the html tag with id”showadd” as below.

jsaddhtml

Why + in front of variables a and b in var c =+a + +b;

Because, the variables a and b were strings before and with + they are converted to integers.

Linking HTML to CSS:

jsaddcss

Wait, CSS? But you said with SASS . Yes we always link the HTML with CSS. Infact it is the styling language which HTML understands. SASS is one of the CSS prepocessors and it’s files will have.sass extension. So, now we need to compile our .sass file to .css and link them as above, this can be done using many tools, I used Koala.

Here is the SASS code and the converted CSS code respectively:

jsaddsass

jsasscss


The final app looks like:

SimpleSassyCal

Changing Color of a Dress using JavaScript and HTML

Well Girls! Lets do some fun learning now… I know every Girl likes Barbie, So Now I am Gonna show you all how can we change the color of dresses of our Barbie.

So First lets Consider the following HTML code:

HTMLColor

Yes, I know the above code is kind of Cluttered,  I will explain each line in detail with comments :
<html>
<head>

//<title> tag helps us to set up a title for the Web App i.e., shown in the tab
<title>Barbie  Dress Up</title>

//<Script> tag to connect the HTML Code and JavaScript.

Html

//Heading with second Larger font (<h1> is the largest font for headings amongst <h1>,< h2>, <h3>
<h2> Choose the Color </h2>

//img tag helps to show an image on a webpage where id is the unique identifier for the image , src is the path of the image exists and height, width helps us to regulate the size of the image (This can be done even with CSS)
<img id=”myBarbieColor” src=”Documents\Pink Mission\Dream\Game Images\CasualShopping.jpg” height=”542″ width=”542″ />

// In order to get these buttons in a row we take them in the form of a table we use <table> tag
<table>
// <tr> tag is the one which  forms a row in a table
<tr>

//<td> tag is a column in a row, <button> helps us to get a button on the webpage and onclick is the action taken place on clicking the button. Here changeBarbieYellow(), changeBarbieBlue() and changeBarbieBlue() are the functions defined in javascript written in BarbieJavaScript.js page
<td> <button type=”button” onclick=”changeBarbieYellow()” > Yellow </button> </td>
<td>
<button type=”button” onclick=”changeBarbieBlue()” > Violet </button> </td>
<td>
<button type=”button” onclick=”changeBarbiePink()” > Pink </button> </td>
</tr>
</table>

</body>
</html>

JAVASCRIPT:

Now, lets discuss the java script part in detail. changeBarbieYellow(), changeBarbieBlue() and changeBarbieGreen() are the three functions we have here.

JavaScript
// Lets explain one of the above function in detail.

function is the keyword used to create a function in JavaScript and changeBarbieYellow() is the method name. color is the variable name. document.getElementById() is the default method used to identify the image based on the id to perform this function. This id is just like the name for an image and color.src is replacing a new image with the old image.
function changeBarbieYellow() {
var color = document.getElementById(‘myBarbieColor’);
color.src =”Documents/Pink Mission/Dream/Game Images/CasualShoppingYellow.jpg”;
}

1454003862465